Saturday, May 30, 2015
Hi everyone,
Today I’d like to share my latest card with you, and show you how it came together.

Here we go:

The base of my card was cut, from double folded cardstock, at 5.7/8 x 5.7/8 The fold is on the left.

Then I cut 2 strips. The teal one was cut at 1 x 5.7/8 The white legder strip was cut at 0.3/4 x 5.7/8 and was torn in half, like in the picture.

Then this beautiful piece of paper was cut at 5.3/8 x 5.7/8

The sides were distressed using the Ingvild Bolme distressing tool.

I glued the teal strip at the top of the base card. Then I glued the floral paper.

The white ledger strip, (which was torn in half) I used one piece at the top, and I flipped the other one and glued it at the bottom.

Then I randonmly tored a strip of white corrugated cardstock and glued it in place. Then cut off the excess.

This little tag was cut at 3 x 1.1/2. I rounded the bottom corners, and made a hole with my Crop-A-Dile.

With the Prima stamp that came in the Main kit, I stamped randomly over the corrugated cardstock, using Archival in Potting Soil. A wonderful brown color.

Then I wrapped some cording around the entire front of my card, and knotted it on the inside of the card. This gives me the opportunity to add an extra little something on the inside of the card. Either stapled to the thread or with a safety pin, etc.

Then I took one of the Chipboard frames (god how much I love these) and started adding 2 layers of Gesso.

While the Gesso was still wet I sprinkled some of the micro beads (these came in the Medium AddOn)

I love how multi colored these are.

And OH MY…. (these are old) I took 2 pink, Prima Marketing E-Line flowers…

Added a litle Gesso on them and sprinkled some micro beads on top.

I glued the big flower first, like so

Then I ran into the problem that I really needed to raise my chipboard frame. So I glued a few pearls to the back of the frame and let it dry for 10 minutes. Time to drink a cup of coffee.

Then I glued the frame into place and placed an acrylic stamping block on top to make sure the frame would stick to the flower and background. I let this dry for another 10 minutes.

From the cord that came in the Main kit: I wrapped it around my fingers, to form a bow, and stapled it in the middle.

When I was sure my frame was nicely adhered, I gently distressed the edges of the tag and slided it right under the frame, like so. I did add 2 layers of foamtape to the bottom half of the tag. This forms a nice platform to stamp.

Then I glued the other flower and bow in place. To cover up the staple I added a rhinestone, which came in the Main kit.

From my stach I selected a small piece of lace (beige colored)

and glued the lace on the left side along the strip of corrugated cardstock. I added some more rhinestones at the left top and bottom right. Lastly I stamped my sentiment using Archival ink in Coffee and Black Jet.
And that’s it. I so love the colors in this kit. All I want to do is make lots and lots of Happy cards!
I hope you do too!
Have a lovely weekend!
Monday, May 18, 2015

This week’s LOTW goes to Shannon B.
Shannon created this adorable layout using the April Kit. Shannon
created some gorgeous floral clusters to highlight that cute picture.
Even thought this is a masculine page, the bling give it the perfect
touch. Her title is “perfect” for her page.
Great layout Shannon. Congratulations!!
Thanks for stopping by the Swirlydoos blog today. If you’re ready to start getting perfectly
coordinated, top of the line scrapbook kits delivered to your door, please
visit us at www.swirlydoos.com. Mention
my name (Kim Heard) when you subscribe and you’ll receive 10% off your first
kit, AND
a coupon good for 30% off your entire purchase in the Swirlydoos.com store!

Saturday, May 16, 2015

This was a really fun tag to make! I hope you'll join me for this month's Swirlydoos Tag of Savagery challenge. The supplies you will need are as follows:
Prima Julie Nutting tag or a tag cut to 3.5 x 8.5"
Aluminum foil
Embossing folder
Double sided tape
Stamp and Archival ink
Clear gesso
2 colors of mist
Black mist, if you don't have black, you could use a dark brown probably
Stencil and masking paste
Chipboard
Washi tape
Embellishments
Step 1:
Get a piece of aluminum foil large enough so that when it is folded in quarters it is slightly larger than your embossing folder.

Tag with foil secured.


Step 7:

Step 8:

Step 11:

Step 12:
Step 13:

Step 13:


Black mist, if you don't have black, you could use a dark brown probably
Stencil and masking paste
Chipboard
Washi tape
Embellishments
Step 1:
Get a piece of aluminum foil large enough so that when it is folded in quarters it is slightly larger than your embossing folder.
Run a couple strips of tape on one side of the foil and then fold in half.

Step 2:

Step 2:
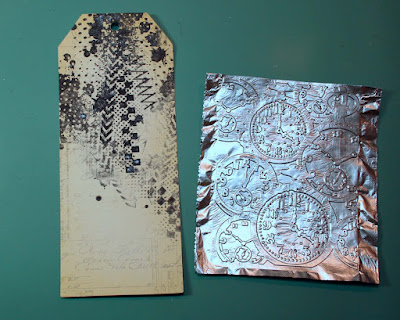
Run a couple more strips of tape down the foil and then fold in quarters. The tape is to hold the layers of foil together. Once it is embossed it will easily stay together. Place the foil inside an embossing folder and emboss.

This is what the foil looks like after it has been embossed.

Step 3:
Cut a tag 3.5 x 8.5" or use a Prima Julie Nutting tag. Do some stamping at the top with Archival ink. Use Archival ink so that when you add mist, the ink doesn't run or smear. I've used Creative Embellishments Distress Corner stamp.
Step 4:

This is what the foil looks like after it has been embossed.

Step 3:
Cut a tag 3.5 x 8.5" or use a Prima Julie Nutting tag. Do some stamping at the top with Archival ink. Use Archival ink so that when you add mist, the ink doesn't run or smear. I've used Creative Embellishments Distress Corner stamp.

Step 4:
Adhere the foil to the tag.
I used scor-tape on the back and folded the foil around the tag using
the scor-tape to secure it.

Tag with foil secured.

Step 5:
Paint the tag with clear gesso.

Step 6:
Select 2 colors of mist and mist the tag. Be sure to dry one color before adding the 2nd color.

Step 6:
Select 2 colors of mist and mist the tag. Be sure to dry one color before adding the 2nd color.

I used Lindy's Grab a Guy Gold and Tibetan Poppy Teal.

Step 7:
Now add some masking.
I used Crafter's Workshop mini time travel stencil and Art C gold embossing
paste.

Step 8:
Now let's prepare our chippy. I'm using Creative Embellishments' Mantle Steampunk Time Piece. Rub over the chippy with black archival ink. You don't want to cover the chippy, just ink it here and there.

Step 9:
Then mist the chippy, I've use Lindy's Grab a Guy Gold.

Step 10:

Step 9:
Then mist the chippy, I've use Lindy's Grab a Guy Gold.

Step 10:
Mist the tag with black spray and then blot up the mist
leaving black ink in the crevices. Allow to dry before going to the next step.

Step 11:
I wanted to intensify the gold mist in the center so I misted again but I
covered up the parts of the tag that I didn't want misted.

Step 12:
Add a piece of washi tape at the seam between the foil and
tag.

Step 13:
Add ribbon or trim at the top and add the chipboard piece. Now the tag is ready to embellish.

Step 13:
The back of my tag was a mess with dribbles of mist etc so an easy way to cover that is to use washi tape and trim to fit the tag.


The finished tag after I embelishments. I used an old Making Memories metal piece for the quote. It was pewter so I used a gold rubz to change the color. Then I added some metal pieces that I got off eBay. I really love that winged heart in the center of the chippy!


When I received the May kit, I wanted to make a tag with it just to show you a different look but using the same techniques. The only thing I didn't do on this tag was spray with black mist. As often happens, I ended up covering a large part of the foil but you can see it a bit near the top and on the side. I used the pink and antique gold mists from the mediums kit on the foil.


Supplies:
From the Main Kit -
Oh so Lovely Specialty Paper Gloss - This is the frame paper and I fussy cut the flowers from this sheet.
Creative Embellishments Mini Frames
Prima Wood Icons
Bo Bunny Double Dot Jewels
From the Mediums Kit -
Kaisercraft Mists in antique gold and pink
Prima Elementals Weaving stencil
From the Flowers Kit -
Petaloo Mums & Butterflies pink
Petaloo Calla Lilies & Berries pink
From my stash -
Teal seam binding
Petaloo mini Botanicas teal and pink (from an old kit)
Prima Manhattan Times Square flower (from an old kit)
Coffee Archival ink
Silver Staz-on
Lindy's Winter Jasmine Gold
Prima Finnabair small doily stamps (from an old kit)
Clear gesso
aluminum foil
Art C gold molding paste
I hope you'll join my challenge at the Swirlydoos Kit Club Forums. You do not have to use Swirlydoos kits to participate in the challenge. And there will be a randomly awarded RAK of some of my favorite tag making supplies to someone. All the details are posted in the challenge thread.
.png)

I love the Creative Embellishments mini frames that came in the main kit and I used one to frame the cameo. I used the same technique as I did above on the Steampunk clock but this time I stamped on a little silver Staz-on ink and then misted with Lindy's Winter Jasmine Gold. The effect doesn't show up great in this photo but it is a mottled antique look. I flipped one of the silhouette wood icons over and stained it with dark brown stain. You can see some of the gold masking behind the silhouette and the foil on the right side.

There at the bottom of the tag you can see where I stamped with archival ink and misted over it with pink mist.

Supplies:
From the Main Kit -
Oh so Lovely Specialty Paper Gloss - This is the frame paper and I fussy cut the flowers from this sheet.
Creative Embellishments Mini Frames
Prima Wood Icons
Bo Bunny Double Dot Jewels
From the Mediums Kit -
Kaisercraft Mists in antique gold and pink
Prima Elementals Weaving stencil
From the Flowers Kit -
Petaloo Mums & Butterflies pink
Petaloo Calla Lilies & Berries pink
From my stash -
Teal seam binding
Petaloo mini Botanicas teal and pink (from an old kit)
Prima Manhattan Times Square flower (from an old kit)
Coffee Archival ink
Silver Staz-on
Lindy's Winter Jasmine Gold
Prima Finnabair small doily stamps (from an old kit)
Clear gesso
aluminum foil
Art C gold molding paste
I hope you'll join my challenge at the Swirlydoos Kit Club Forums. You do not have to use Swirlydoos kits to participate in the challenge. And there will be a randomly awarded RAK of some of my favorite tag making supplies to someone. All the details are posted in the challenge thread.
Subscribe to:
Posts (Atom)

Be sure to "LIKE & FOLLOW" Swirlydoos for special FB only deals and promos
Follow this blog with bloglovin

Scrapbook Sketches

see all of our sketches here
Keep Tabs On Our Blog!


Popular Posts
-
 Welcome to Swirlydoos' March Kit Reveal Blog Hop Block Party!! We have some amazing projects for you to see today and as a bonus...
 -
 Welcome to Swirlydoos' Mystical Winter kit reveal Blog Hop Block Party!! Happy New Year and Welcome!!! This month's kit,...
 -
 Welcome to Swirlydoos' June Kit Reveal Blog Hop Block Party!! We are so pleased to show off our June kit, Antiquities!!! This kit...
 -
 Thank you for joining us today for our ONE DAY blog hop featuring our September kit collection, Gilted Pleasure . **All collec...
 -
 It's the big re ve al ! The full M onty! Check out our November kit, Nouveau ! Be sure to check out a video "tour" of...
 -
 Welcome to the FALL SPLENDOR blog hop with PaperHaus Swirlydoo s Kit Club is proud to offer our Christmas themed "BELI...
 -
 I wanted to showcase some of our entires for the Swiryhues Challenge. Just look how beautifully some of the entries are for this palette. ...
 -
 It's the big re ve al ! Say hello to our December kit! Be sure to check out a video "tour" of the main kit, kit add ons an...
 -
 Boy, oh boy do we have a stellar hop for you this month!! Just when I think that Krissy couldn't possibly created a prettier ki...
 -
 Welcome to Swirlydoos November Kit Reveal Blog Hop BLOCK PARTY!!! That's right, we are having a party and you are all invit...